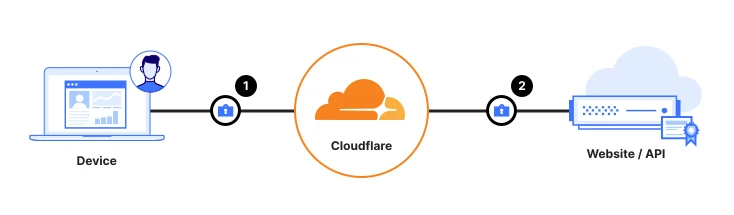
Module 5 — Gateway (Web Filtering / Secure Web Gateway)
Mục tiêu: Lọc lưu lượng internet của người dùng — chặn malware, phishing và các danh mục rủi ro ở tầng DNS, sau đó kiểm tra lưu lượng web (HTTPS) để thực thi chính sách sử dụng hợp lệ. Đây cũng là cơ chế mà DLP (Module 6) và kiểm soát AI (Module 7) gắn vào.
|
|
| 👤 Ai làm việc này |
Đội bảo mật |
| ⏱️ Thời gian |
~60 phút |
| 🎯 Kết thúc bạn sẽ có |
Malware/phishing bị chặn, một trang chặn hoạt động, và kiểm tra HTTPS đang chạy trên nhóm thử nghiệm |
| ✋ Trước khi bắt đầu |
Đã xong Module 3 (thiết bị kết nối ở chế độ Gateway with WARP, đã cài chứng chỉ Cloudflare) |
🧱 Xây theo từng lớp, theo thứ tự này: DNS (dễ nhất, an toàn nhất) → Network → HTTP/HTTPS (mạnh nhất, cần chứng chỉ). Làm DNS trước và bạn có giá trị trong 5 phút.
Phần A — Lọc DNS (bắt đầu tại đây)
Lọc DNS chặn các tên miền xấu trước khi kết nối được thiết lập. Nó hoạt động ngay cả khi không có kiểm tra sâu, nên đây là bước đầu an toàn nhất.
Bước A1 — Chặn mối đe dọa bảo mật
- 👉 Zero Trust → Gateway → Firewall Policies → tab DNS.
- 👉 Nhấp Add a policy.
- ⌨️ Policy name:
Block security threats.
- 👉 Xây quy tắc:
| Trường |
Giá trị |
| Selector |
Security Categories |
| Operator |
in |
| Value |
đánh dấu Malware, Phishing, Command & Control, Cryptomining, DNS Tunneling, DGA Domains, New Domains |
- 👉 Action: Block.
- 👉 Nhấp Create policy.
✅ Điểm kiểm tra: Chính sách xuất hiện ở đầu danh sách DNS của bạn, đã bật.
Bước A2 — Kiểm tra lệnh chặn (thử nghiệm an toàn)
- 👉 Trên thiết bị thử nghiệm, duyệt tới một trang mối đe dọa thử nghiệm của Cloudflare (vd.
https://malware.testcategory.com).
- 📺 Bạn sẽ thấy: Một trang chặn của Cloudflare thay vì trang web. 🎉
✅ Điểm kiểm tra: Trang chặn xuất hiện. (Nếu trang thật vẫn tải, xem khắc phục sự cố.)
Bước A3 — Thực thi sử dụng hợp lệ (danh mục nội dung tùy chọn)
- 👉 Thêm một chính sách DNS khác tên
Block content categories.
- 👉 Selector Content Categories → in → đánh dấu các danh mục theo chính sách của bạn (vd. Adult Themes, Gambling).
- 👉 Action Block → Create policy.
Bước A4 — Bảo vệ văn phòng không có client (DNS Locations)
Với cả văn phòng/mạng nơi bạn không thể cài ứng dụng trên mọi thiết bị:
- 👉 Gateway → DNS Locations → Add a location.
- ⌨️ Đặt tên (vd.
HQ-London).
- 📺 Cloudflare hiện DNS endpoints (một địa chỉ IPv4/IPv6, một URL DoH, và một hostname DoT).
- 👉 Trỏ router/DNS forwarder của văn phòng đó tới các endpoint này.
✅ Điểm kiểm tra: Truy vấn DNS từ văn phòng đó giờ xuất hiện dưới Gateway → Logs → DNS và tuân theo chính sách của bạn.
Phần B — Lọc mạng (tùy chọn, L4)
Kiểm soát lưu lượng theo cổng/giao thức — ví dụ, ngăn client gửi email trực tiếp.
- 👉 Gateway → Firewall Policies → Network → Add a policy.
- ⌨️ Name:
Block direct SMTP.
- 👉 Rule: Selector Destination Port → in →
25. Action Block.
- 👉 Create policy.
💡 Chính sách Network yêu cầu thiết bị ở chế độ Gateway with WARP (hoặc một site Cloudflare WAN). Chúng không có tác dụng với thiết lập chỉ DNS.
Phần C — Kiểm tra lưu lượng HTTPS (TLS decryption)
Để lọc bên trong lưu lượng web đã mã hóa (và để bật quét DLP và AI), Cloudflare cần giải mã rồi mã hóa lại HTTPS bằng chứng chỉ bạn đã cài ở Module 3.
⚠️ Lưu ý — làm đúng thứ tự nếu không bạn sẽ làm hỏng website:
- ✅ Xác nhận chứng chỉ Cloudflare đã được cài trên thiết bị thử nghiệm (Module 3, Phần D).
- ✅ Thiết lập các ngoại lệ "Do Not Inspect" TRƯỚC (Bước C1 bên dưới).
- ✅ Chỉ sau đó mới bật giải mã On (Bước C2), và chỉ cho nhóm thử nghiệm của bạn.
Bước C1 — Thêm ngoại lệ Do Not Inspect (trước khi bật)
Một số ứng dụng từ chối hoạt động khi bị kiểm tra (chúng "pin" chứng chỉ). Hãy miễn trừ chúng trước.
- 👉 Gateway → Firewall Policies → HTTP → Add a policy.
- ⌨️ Name:
Do Not Inspect - incompatible apps.
- 👉 Rule: Selector Application → in → chọn loại ứng dụng "Do Not Inspect" có sẵn (Cloudflare cập nhật danh sách này cho các ứng dụng không tương thích đã biết).
- 👉 Action: Do Not Inspect → Create policy.
- 💡 Nếu bạn dùng Microsoft 365, cũng hãy bật ngoại lệ lưu lượng Microsoft 365 một cú nhấp trong Settings → Network (hoặc thêm nó như một application tại đây).
Bước C2 — Bật TLS decryption
- 👉 Zero Trust → Settings → Network.
- 👉 Tìm TLS decryption (Firewall) → bật On.
✅ Điểm kiểm tra: Trên một thiết bị thử nghiệm, duyệt vài trang HTTPS bình thường (email của bạn, một trang tin). Chúng phải tải không có cảnh báo chứng chỉ. Nếu bạn gặp cảnh báo, chứng chỉ chưa được tin cậy — quay lại Module 3 Phần D.
Bước C3 — Xác nhận kiểm tra đang hoạt động
- 👉 Gateway → Logs → HTTP.
- 📺 Bạn giờ thấy các mục với URL/đường dẫn đầy đủ (không chỉ tên miền), chứng tỏ HTTPS đang được kiểm tra.
Phần D — Chính sách HTTP (thực thi quy tắc web)
Giờ bạn có thể viết các quy tắc mạnh trên lưu lượng web.
Ví dụ 1 — Chặn một loại tệp tới các trang rủi ro
- 👉 Gateway → Firewall Policies → HTTP → Add a policy.
- ⌨️ Name:
Block executable downloads from uncategorized sites.
- 👉 Rules:
- Selector Download File Types → in →
Executable
- And Selector Content Categories → in →
Unreachable/Uncategorized
- 👉 Action Block → Create policy.
Ví dụ 2 — Cách ly duyệt web rủi ro (remote browser)
- 👉 Chính sách HTTP mới tên
Isolate uncategorized.
- 👉 Rule: Selector Content Categories → in →
Newly Seen Domains.
- 👉 Action: Isolate → Create policy.
📺 Người dùng vẫn mở được các trang này, nhưng chúng chạy trong một remote browser an toàn — không có gì rủi ro chạm tới thiết bị.
Ví dụ 3 — Cho phép một ứng dụng nhưng giới hạn hành động (kiểm soát chi tiết)
- 👉 Chính sách HTTP mới. Selector Application → in → vd. một ứng dụng chia sẻ tệp.
- 👉 Mở rộng Application granular controls → chỉ chặn hành động Upload.
- 👉 Action Allow (với lệnh chặn chi tiết) → Create policy.
💡 Mẫu "cho phép nhưng hạn chế" này chính là mẫu bạn sẽ dùng lại cho công cụ AI ở Module 7.
Phần E — Mở rộng từ thử nghiệm sang mọi người
- ✅ Xác nhận với nhóm thử nghiệm trong vài ngày: website hoạt động, mối đe dọa bị chặn, không có khiếu nại lớn.
- 👉 Đẩy chứng chỉ Cloudflare tới mọi thiết bị qua MDM (Module 3, Phần F).
- 👉 Chính sách DNS/HTTP của bạn đã áp dụng cho mọi thiết bị đã đăng ký — mở rộng đăng ký thiết bị cho toàn bộ nhân viên.
- 👉 Theo dõi Gateway → Logs và Analytics để phát hiện dương tính giả; thêm ngoại lệ khi cần.
✅ Hoàn thành Module 5!
Bây giờ bạn có:
- ✅ Lọc DNS đang chặn malware/phishing (với trang chặn đã xác minh)
- ✅ (Tùy chọn) quy tắc network + danh mục nội dung
- ✅ Kiểm tra HTTPS đang chạy an toàn trên nhóm thử nghiệm
- ✅ Chính sách HTTP thực thi sử dụng hợp lệ
- ✅ Một lộ trình triển khai cho toàn bộ đội thiết bị
Khắc phục nhanh
| Vấn đề |
Cách khắc phục |
| Trang mối đe dọa thử nghiệm vẫn tải |
Thiết bị không dùng Gateway DNS — xác nhận chế độ Gateway with WARP (Module 3) và rằng gateway=on trong trace |
| Các trang HTTPS hiện lỗi chứng chỉ |
Chứng chỉ Cloudflare chưa được tin cậy trên thiết bị — cài nó (Module 3 Phần D) |
| Một ứng dụng cụ thể hỏng sau khi giải mã |
Thêm nó vào chính sách Do Not Inspect (Phần C1) |
| Log hiện tên miền nhưng không có URL đầy đủ |
TLS decryption đang tắt — bật nó (Phần C2) |
| Quá nhiều lần chặn nhầm |
Thu hẹp phạm vi chính sách, hoặc thêm quy tắc Allow/Do-Not-Inspect phía trên nó (chính sách đi từ trên xuống) |
💡 Cần IP nguồn cố định (để ứng dụng SaaS có thể allowlist tổ chức bạn), hoặc muốn tắt IPv6? Đó là chính sách egress — xem trang đi kèm: Module 5b — Chính sách Egress & kiểm soát phiên bản IP.
🛡️ Muốn chạy các trang rủi ro trong một remote browser an toàn (và tắt copy/paste, tải xuống, in)? Đó là Remote Browser Isolation — xem Module 5c — Remote Browser Isolation (RBI).
🔎 Muốn thấy mọi ứng dụng SaaS & AI mà mọi người dùng và phê duyệt/chặn chúng tự động? Đó là Shadow IT Discovery — xem Module 5d — Shadow IT & AI Security Adoption.
Bạn sẽ phát hiện và ngăn dữ liệu nhạy cảm rời đi. (Cần Enterprise.)
Module 5 — Gateway (Web Filtering / Secure Web Gateway)
Goal: Filter your users' internet traffic — block malware, phishing, and risky categories at the DNS layer, then inspect web (HTTPS) traffic to enforce acceptable use. This is also the engine that DLP (Module 6) and AI controls (Module 7) plug into.
|
|
| 👤 Who does this |
Security team |
| ⏱️ Time |
~60 minutes |
| 🎯 You'll finish with |
Malware/phishing blocked, a working block page, and HTTPS inspection running on your pilot group |
| ✋ Before you begin |
Module 3 done (devices connected in Gateway with WARP mode, Cloudflare certificate installed) |
🧱 Build it in layers, in this order: DNS (easiest, safest) → Network → HTTP/HTTPS (most powerful, needs the certificate). Do DNS first and you get value in 5 minutes.
Part A — DNS filtering (start here)
DNS filtering blocks bad domains before a connection is even made. It works even without deep inspection, so it's the safest first step.
Step A1 — Block security threats
- 👉 Zero Trust → Gateway → Firewall Policies → DNS tab.
- 👉 Click Add a policy.
- ⌨️ Policy name:
Block security threats.
- 👉 Build the rule:
| Field |
Value |
| Selector |
Security Categories |
| Operator |
in |
| Value |
tick Malware, Phishing, Command & Control, Cryptomining, DNS Tunneling, DGA Domains, New Domains |
- 👉 Action: Block.
- 👉 Click Create policy.
✅ Checkpoint: The policy appears at the top of your DNS list, enabled.
Step A2 — Test the block (safe test)
- 👉 On your pilot device, browse to a Cloudflare test threat page (e.g.
https://malware.testcategory.com).
- 📺 What you'll see: A Cloudflare block page instead of the site. 🎉
✅ Checkpoint: The block page appears. (If the real site loads, see troubleshooting.)
Step A3 — Enforce acceptable use (optional content categories)
- 👉 Add another DNS policy named
Block content categories.
- 👉 Selector Content Categories → in → tick categories per your policy (e.g. Adult Themes, Gambling).
- 👉 Action Block → Create policy.
Step A4 — Protect offices without the client (DNS Locations)
For a whole office/network where you can't install the app on every device:
- 👉 Gateway → DNS Locations → Add a location.
- ⌨️ Name it (e.g.
HQ-London).
- 📺 Cloudflare shows you DNS endpoints (an IPv4/IPv6 address, a DoH URL, and a DoT hostname).
- 👉 Point that office's router/DNS forwarder at those endpoints.
✅ Checkpoint: DNS queries from that office now show up under Gateway → Logs → DNS and obey your policies.
Part B — Network filtering (optional, L4)
Control traffic by port/protocol — for example, stop clients sending email directly.
- 👉 Gateway → Firewall Policies → Network → Add a policy.
- ⌨️ Name:
Block direct SMTP.
- 👉 Rule: Selector Destination Port → in →
25. Action Block.
- 👉 Create policy.
💡 Network policies require devices in Gateway with WARP mode (or a Cloudflare WAN site). They do nothing for DNS-only setups.
Part C — Inspect HTTPS traffic (TLS decryption)
To filter inside encrypted web traffic (and to enable DLP and AI scanning), Cloudflare needs to decrypt and re-encrypt HTTPS using the certificate you installed in Module 3.
⚠️ Watch out — do this in the right order or you'll break websites:
- ✅ Confirm the Cloudflare certificate is installed on your pilot devices (Module 3, Part D).
- ✅ Set up your "Do Not Inspect" exceptions FIRST (Step C1 below).
- ✅ Only then turn decryption on (Step C2), and only for your pilot group.
Step C1 — Add Do Not Inspect exceptions (before enabling)
Some apps refuse to work when inspected (they "pin" their certificate). Exempt them first.
- 👉 Gateway → Firewall Policies → HTTP → Add a policy.
- ⌨️ Name:
Do Not Inspect - incompatible apps.
- 👉 Rule: Selector Application → in → choose the built-in "Do Not Inspect" application type (Cloudflare keeps this list updated for known incompatible apps).
- 👉 Action: Do Not Inspect → Create policy.
- 💡 If you use Microsoft 365, also turn on the one-click Microsoft 365 traffic exception in Settings → Network (or add it as an application here).
Step C2 — Turn on TLS decryption
- 👉 Zero Trust → Settings → Network.
- 👉 Find TLS decryption (Firewall) → toggle it On.
✅ Checkpoint: On a pilot device, browse a few normal HTTPS sites (your email, a news site). They should load without certificate warnings. If you get warnings, the certificate isn't trusted — revisit Module 3 Part D.
Step C3 — Verify inspection is working
- 👉 Gateway → Logs → HTTP.
- 📺 You now see entries with full URLs/paths (not just domains), proving HTTPS is being inspected.
Part D — HTTP policies (enforce web rules)
Now you can write powerful rules on web traffic.
Example 1 — Block a file type to risky sites
- 👉 Gateway → Firewall Policies → HTTP → Add a policy.
- ⌨️ Name:
Block executable downloads from uncategorized sites.
- 👉 Rules:
- Selector Download File Types → in →
Executable
- And Selector Content Categories → in →
Unreachable/Uncategorized
- 👉 Action Block → Create policy.
Example 2 — Isolate risky browsing (remote browser)
- 👉 New HTTP policy named
Isolate uncategorized.
- 👉 Rule: Selector Content Categories → in →
Newly Seen Domains.
- 👉 Action: Isolate → Create policy.
📺 Users can still open these sites, but they run in a safe remote browser — nothing risky touches the device.
Example 3 — Allow an app but limit actions (granular control)
- 👉 New HTTP policy. Selector Application → in → e.g. a file-sharing app.
- 👉 Expand Application granular controls → block the Upload action only.
- 👉 Action Allow (with the granular block) → Create policy.
💡 This "allow but restrict" pattern is exactly what you'll reuse for AI tools in Module 7.
Part E — Expand from pilot to everyone
- ✅ Confirm with your pilot group for a few days: websites work, threats are blocked, no major complaints.
- 👉 Push the Cloudflare certificate to all devices via MDM (Module 3, Part F).
- 👉 Your DNS/HTTP policies already apply to every enrolled device — widen device enrollment to all staff.
- 👉 Watch Gateway → Logs and Analytics for false positives; add exceptions as needed.
✅ Module 5 complete!
You now have:
- ✅ DNS filtering blocking malware/phishing (with a verified block page)
- ✅ (Optional) network + content-category rules
- ✅ HTTPS inspection running safely on your pilot group
- ✅ HTTP policies enforcing acceptable use
- ✅ A rollout path to the whole fleet
Quick troubleshooting
| Problem |
Fix |
| Test threat site still loads |
Device isn't using Gateway DNS — confirm Gateway with WARP mode (Module 3) and that gateway=on in the trace |
| HTTPS sites show certificate errors |
Cloudflare certificate not trusted on the device — install it (Module 3 Part D) |
| A specific app breaks after decryption |
Add it to a Do Not Inspect policy (Part C1) |
| Logs show domains but not full URLs |
TLS decryption is off — enable it (Part C2) |
| Too many false blocks |
Narrow the policy scope, or add an Allow/Do-Not-Inspect rule above it (policies are top-down) |
💡 Need a fixed source IP (so a SaaS app can allowlist your org), or want to disable IPv6? Those are egress policies — see the companion page: Module 5b — Egress Policies & IP Version Control.
🛡️ Want to run risky sites in a safe remote browser (and disable copy/paste, downloads, printing)? That's Remote Browser Isolation — see Module 5c — Remote Browser Isolation (RBI).
🔎 Want to see every SaaS & AI app your people use and approve/block them automatically? That's Shadow IT Discovery — see Module 5d — Shadow IT & AI Security Adoption.
You'll detect and stop sensitive data from leaving. (Requires Enterprise.)
Nguồn cộng đồng — không phải tài liệu chính thức của Cloudflare: https://zerotrust.cfsase.workers.dev
Community source — not an official Cloudflare publication: https://zerotrust.cfsase.workers.dev