Mô-đun 7b — Bảo mật AI & MCP với Access (MCP Server Portals)
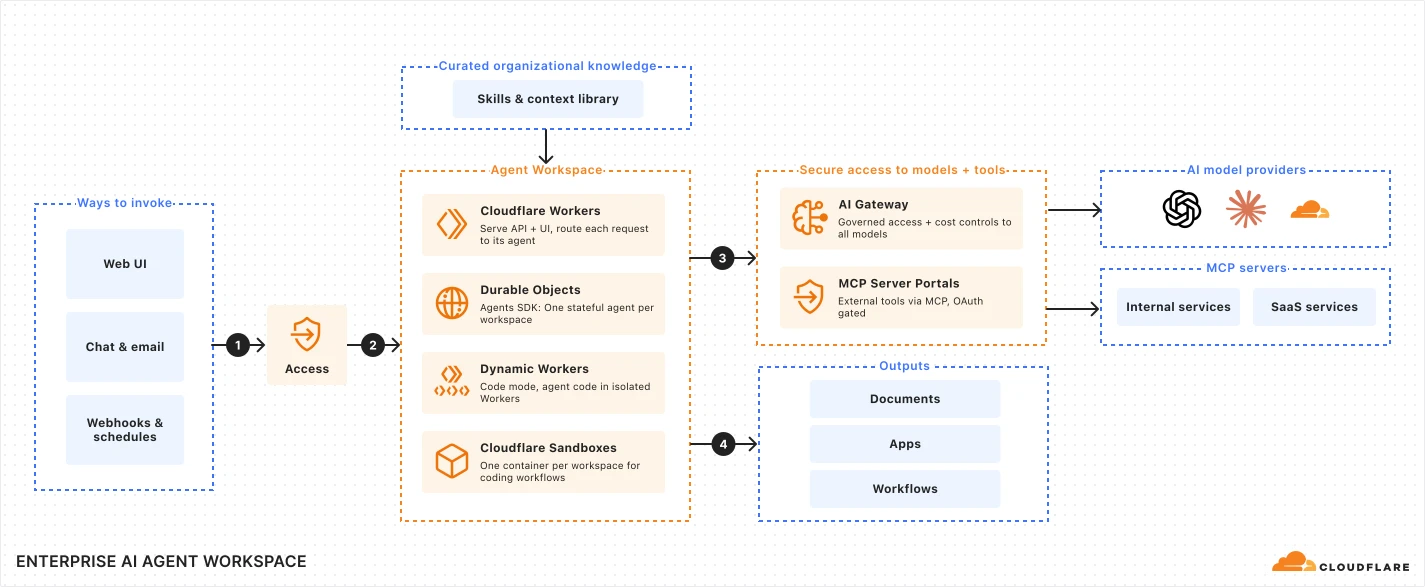
Mục tiêu: Đưa các công cụ AI mà nhân viên (và AI agent) của bạn dùng vào tầm kiểm soát Zero Trust — đặt máy chủ MCP nội bộ sau Cloudflare Access, và cho người dùng một endpoint MCP portal được quản trị với công cụ đã chọn lọc, danh tính theo từng người dùng, và ghi log đầy đủ.
|
|
| 👤 Ai làm việc này |
Nhóm bảo mật / nền tảng |
| ⏱️ Thời gian |
~40 phút |
| 🎯 Kết thúc bạn sẽ có |
Máy chủ MCP dưới kiểm soát Access, một URL MCP portal duy nhất mà người dùng/agent kết nối tới, và ghi log cấp request |
| ✋ Trước khi bắt đầu |
Đã xong Mô-đun 2 (danh tính); một domain (zone) trong tài khoản Cloudflare của bạn; ít nhất một URL máy chủ MCP cần bảo vệ |
🧭 MCP là gì? Model Context Protocol là cách trợ lý AI (Claude, ChatGPT desktop, Cursor, v.v.) kết nối tới công cụ và dữ liệu bên ngoài — hệ thống tệp, wiki, cơ sở dữ liệu, API SaaS. Mỗi máy chủ MCP mà một agent có thể chạm tới là một cánh cửa mới vào dữ liệu của bạn. Mô-đun này đặt danh tính, chính sách và ghi log trước những cánh cửa đó.
💡 Phần này mở rộng Phần E của Mô-đun 7. Mô-đun 7 quản trị người dùng duyệt tới ứng dụng AI; mô-đun này quản trị AI agent kết nối tới công cụ.
Vì sao cần bảo mật MCP
| Rủi ro khi không có kiểm soát |
Zero Trust bổ sung gì |
| Bất kỳ nhân viên/agent nào cũng có thể kết nối tới bất kỳ máy chủ MCP nào |
Access policies quyết định ai (và agent nào) được dùng từng máy chủ |
| Không có hồ sơ về công cụ nào mà AI agent đã gọi |
Ghi log theo từng request cho mọi lần gọi công cụ |
| Dữ liệu nhạy cảm chảy vào công cụ AI mà không được kiểm tra |
Tùy chọn định tuyến lưu lượng portal qua Gateway + DLP |
| Hàng chục endpoint MCP cần cấu hình trong mọi client |
Một URL portal gom chúng lại, với công cụ đã chọn lọc |
| Bot/agent không thể hoàn tất đăng nhập trình duyệt |
Managed OAuth + service tokens cho client không dùng trình duyệt |
Có hai khối xây dựng. Làm theo thứ tự:
- Bảo mật từng máy chủ MCP — đưa từng máy chủ vào Access (Phần A–B).
- Tạo MCP portal — gom các máy chủ thành một endpoint được quản trị (Phần C–E).
Phần A — Chọn cách bảo mật từng máy chủ MCP
Cloudflare Access có thể đứng trước một máy chủ MCP theo vài cách. Chọn theo từng máy chủ:
| Cách tiếp cận |
Phù hợp nhất với |
Ai xử lý xác thực |
| Self-hosted MCP server (khuyến nghị) |
Máy chủ MCP bạn tự chạy, phục vụ qua Cloudflare trong tài khoản này |
Cloudflare Access (đơn giản nhất — Access làm giúp bạn) |
| Customer-managed third-party MCP |
Mã MCP bên thứ ba chạy trên hostname bạn kiểm soát |
Máy chủ MCP bên thứ ba |
| SaaS-managed third-party MCP |
MCP do nhà cung cấp host, chấp nhận thiết lập OAuth/OIDC của bạn |
Máy chủ MCP, với Access làm OIDC provider |
⭐ Khuyến nghị: với máy chủ bạn kiểm soát, dùng cách self-hosted và để Access xử lý xác thực. Chỉ dùng cách SaaS/OIDC khi máy chủ do nhà cung cấp host yêu cầu vậy.
Biến Access thành OAuth provider (SaaS-managed) — phiên bản ngắn
- 👉 Access controls → Applications → Create new application → SaaS application.
- ⌨️ Đặt tên (ví dụ
MCP server), chọn OIDC, Add application.
- ⌨️ Trong Redirect URLs, nhập URL callback của máy chủ MCP (ví dụ
https://<mcp-host>/callback).
- 📋 Sao chép Client ID, Client secret, Token / Authorization / Key endpoints vào cấu hình máy chủ MCP của bạn.
- 👉 Thêm Access policies (ai được dùng) và chọn identity providers của bạn. Lưu.
⚠️ Chỉ bật Managed OAuth cho mã máy chủ MCP xác thực Access JWT (header Cf-Access-Jwt-Assertion). Với mã bên thứ ba bạn không thể sửa, dùng luồng OAuth riêng của máy chủ.
Phần B — Thêm máy chủ MCP vào Access
Đưa từng máy chủ vào quản lý tập trung (đây cũng là điều kiện tiên quyết để đưa nó vào portal).
- 👉 Trong dashboard, vào Zero Trust → Access controls → AI controls.
- 👉 Mở tab MCP servers → Add an MCP server.
- ⌨️ Nhập name (ví dụ
Company Wiki MCP).
- ⌨️ (Tùy chọn) đặt Server ID tùy chỉnh.
- ⌨️ Trong HTTP URL, nhập URL đầy đủ của máy chủ — ví dụ máy chủ MCP Cloudflare Docs:
https://docs.mcp.cloudflare.com/mcp.
- 👉 Thêm Access policies để hiện/ẩn máy chủ: người dùng khớp chính sách Allow sẽ thấy nó trong portal; người khác thì không.
- 👉 Nhấp Save and connect server.
- 👉 Nếu máy chủ hỗ trợ OAuth, đăng nhập khi được chuyển hướng — tài khoản đó trở thành thông tin xác thực admin cho máy chủ này (portal có thể dùng nó để gửi request).
📺 Bạn sẽ thấy: Access xác thực kết nối, kéo danh sách công cụ/prompt/tài nguyên, và server status trở thành Ready.
⚠️ Lưu ý: Thêm Access policies ở đây kiểm soát khả năng hiện trong portal. Người dùng bị chặn vẫn có thể truy cập máy chủ qua URL trực tiếp — để thực sự bắt buộc xác thực, hãy để Access làm OAuth provider của máy chủ (Phần A).
✅ Điểm kiểm tra: Máy chủ MCP của bạn hiển thị Ready trong tab MCP servers.
Phần C — Tạo MCP server portal
Một portal cho người dùng và agent của bạn một endpoint gom nhiều máy chủ MCP, chỉ với các công cụ bạn chọn.
- 👉 Zero Trust → Access controls → AI controls → Add MCP server portal.
- ⌨️ Nhập name (ví dụ
Engineering AI Tools).
- 👉 Dưới Custom domain, chọn một domain (phải là zone đang hoạt động trong tài khoản của bạn); tùy chọn đặt subdomain (ví dụ
mcp).
- 👉 Add MCP servers — chọn các máy chủ từ Phần B bạn muốn đưa vào portal này.
- 👉 (Tùy chọn) Dưới MCP servers, configure the tools and prompts được mở qua portal — chỉ mở những gì đối tượng này cần.
- 👉 Đặt Require user auth theo từng máy chủ:
- Enabled (mặc định) — mỗi người dùng xác thực bằng thông tin xác thực của chính họ với máy chủ đó (quyền tối thiểu, dấu vết kiểm toán tốt nhất).
- Disabled — người dùng đã kết nối tới máy chủ qua thông tin xác thực admin của nó (dùng hạn chế).
- 👉 Thêm Access policies xác định ai được kết nối tới portal.
- 👉 Nhấp Add an MCP server portal.
📺 Người dùng giờ kết nối tại https://<subdomain>.<domain>/mcp với bất kỳ MCP client nào.
⚠️ Hạn chế chính sách: MFA độc lập, purpose justification và xác thực tạm thời không được áp dụng cho máy chủ được ủy quyền qua portal. Nếu một máy chủ cần step-up MFA, hãy áp dụng tại Access application riêng của máy chủ đó.
✅ Điểm kiểm tra: Portal xuất hiện trong AI controls với các máy chủ bạn chọn, và URL portal phân giải được.
Càng ít ngữ cảnh không liên quan bạn mở ra, phản hồi của AI càng tốt (và an toàn) hơn.
- 👉 Chọn công cụ/prompt cụ thể cho từng portal (Phần C bước 5) để người dùng có bộ công cụ tập trung.
- 👉 Đổi tên bằng alias: sửa name and description của công cụ hoặc prompt ở cấp portal hoặc máy chủ — mà không thay đổi máy chủ nguồn. Tên rõ giúp cả người lẫn AI agent chọn đúng công cụ.
- 👉 Tối ưu ngữ cảnh: portal hỗ trợ tùy chọn query-parameter để thu nhỏ hoặc ẩn định nghĩa công cụ và giảm mức dùng cửa sổ ngữ cảnh.
- 💡 Code Mode (bật mặc định): gom mọi công cụ thành một công cụ
code duy nhất — agent viết JavaScript gọi các phương thức có kiểu, chạy trong Cloudflare Worker cô lập. Mức dùng ngữ cảnh giữ cố định dù bạn thêm bao nhiêu công cụ.
Phần E — Kết nối client & agent (Managed OAuth + service tokens)
Người dùng / AI client tương tác — Managed OAuth
Managed OAuth bật mặc định với portal mới. Nó cho phép MCP client không dùng trình duyệt (Claude Desktop, Cursor, CLI, SDK) xác thực qua luồng authorization-code OAuth 2.0 chuẩn: client nhận 401 với header WWW-Authenticate, mở trình duyệt tới trang đăng nhập Access của bạn, và nhận token. Cùng Access policies, phương tiện vận chuyển mới.
- 👉 Để xác nhận/bật: portal → ⋯ → Edit → Advanced settings → Managed OAuth → bật → Save.
Bot / agent tự hành — service tokens
Với agent máy-với-máy không thể đăng nhập trình duyệt:
- 👉 Tạo Access service token (Access → Service Auth → Service Tokens).
- 👉 Thêm chính sách Service Auth khớp token đó với Access application của portal và với application của từng máy chủ được liên kết.
- 👉 Tắt Require user auth cho những máy chủ đó (portal dùng thông tin xác thực admin).
- 👉 Agent kết nối với header
CF-Access-Client-Id và CF-Access-Client-Secret và thấy công cụ của mọi máy chủ nó được ủy quyền.
⚠️ Máy chủ vẫn yêu cầu per-user OAuth bị loại khỏi phiên service-token (token không thể hoàn tất grant theo từng người dùng).
✅ Điểm kiểm tra: Một MCP client kết nối tới https://<subdomain>.<domain>/mcp, xác thực qua Access, và chỉ thấy các công cụ đã chọn lọc.
Phần F — Quan sát & DLP
- 👉 Access logs ghi từng request công cụ riêng lẻ thực hiện qua portal — vào Logs → Access để xem ai/cái gì đã gọi công cụ nào.
- 👉 (Tùy chọn, mạnh) Route portal traffic through Gateway để có ghi log HTTP phong phú hơn và quét DLP — để dữ liệu nhạy cảm chảy vào hoặc ra khỏi công cụ MCP được kiểm tra bằng cùng DLP profiles từ Mô-đun 6.
✅ Điểm kiểm tra: Các lần gọi công cụ xuất hiện trong Access logs; nếu định tuyến qua Gateway, chúng cũng hiện trong Gateway HTTP logs với mọi khớp DLP.
✅ Hoàn thành Mô-đun 7b!
Bây giờ bạn có:
- ✅ Máy chủ MCP được đưa vào Access (với Access tùy chọn làm OAuth provider)
- ✅ Một endpoint MCP portal duy nhất gom các công cụ đã chọn lọc
- ✅ Danh tính theo từng người dùng (Require user auth) và truy cập service-token cho bot
- ✅ Managed OAuth cho AI client không dùng trình duyệt
- ✅ Ghi log cấp request, tùy chọn với Gateway + DLP
Cách này khớp với bức tranh AI lớn hơn
| Lớp |
Mô-đun |
Quản trị |
| Người dùng duyệt ứng dụng web AI |
7 |
Phát hiện shadow-AI, cho phép-kèm-guardrails, prompt DLP |
| AI agent kết nối tới công cụ |
7b (mô-đun này) |
Máy chủ MCP + portal sau Access |
| Việc dùng AI rủi ro trong trình duyệt |
5c |
Isolate + tắt paste/upload |
| Phát hiện dữ liệu nhạy cảm |
6 |
DLP profiles (gồm AI prompt topics) |
Khắc phục nhanh
| Vấn đề |
Cách khắc phục |
| Không có AI controls trong menu |
Xác nhận gói/quyền của bạn và rằng bạn là quản trị viên Zero Trust |
| Máy chủ MCP bị kẹt, không Ready |
Kiểm tra lại HTTP URL; hoàn tất đăng nhập OAuth nếu máy chủ yêu cầu (Phần B) |
| Người dùng bị chặn vẫn tới được máy chủ |
Chính sách add-to-Access chỉ kiểm soát khả năng hiện trong portal — hãy để Access làm OAuth provider của máy chủ để bắt buộc xác thực (Phần A) |
| Không tạo được URL portal |
Custom domain phải là zone đang hoạt động trong tài khoản của bạn (Phần C) |
| AI client không xác thực được |
Đảm bảo Managed OAuth đang bật cho portal (Phần E) |
| Bot/agent không kết nối được |
Dùng service token + chính sách Service Auth trên portal và các máy chủ, rồi tắt Require user auth (Phần E) |
| Step-up MFA không nhắc |
MFA/purpose-justification không được áp dụng qua portal — áp dụng trên Access app riêng của máy chủ (Phần C) |
Kết nối cả văn phòng và trung tâm dữ liệu với Cloudflare.
Module 7b — Secure AI & MCP with Access (MCP Server Portals)
Goal: Bring the AI tools your people (and your AI agents) use under Zero Trust control — put internal MCP servers behind Cloudflare Access, and give users one governed MCP portal endpoint with curated tools, per-user identity, and full logging.
|
|
| 👤 Who does this |
Security / platform team |
| ⏱️ Time |
~40 minutes |
| 🎯 You'll finish with |
MCP servers under Access control, a single MCP portal URL your users/agents connect to, and request-level logging |
| ✋ Before you begin |
Module 2 (identity) done; a domain (zone) in your Cloudflare account; at least one MCP server URL to protect |
🧭 What's MCP? The Model Context Protocol is how AI assistants (Claude, ChatGPT desktop, Cursor, etc.) connect to external tools and data — file systems, wikis, databases, SaaS APIs. Every MCP server an agent can reach is a new door into your data. This module puts identity, policy, and logging in front of those doors.
💡 This expands Part E of Module 7. Module 7 governs users browsing to AI apps; this module governs AI agents connecting to tools.
Why secure MCP
| Risk without controls |
What Zero Trust adds |
| Any employee/agent can connect to any MCP server |
Access policies decide who (and which agents) can use each server |
| No record of what tools an AI agent invoked |
Per-request logging of every tool call |
| Sensitive data flows into AI tools unchecked |
Optionally route portal traffic through Gateway + DLP |
| Dozens of MCP endpoints to configure in every client |
One portal URL aggregates them, with curated tools |
| Bots/agents can't complete browser logins |
Managed OAuth + service tokens for non-browser clients |
There are two building blocks. Do them in order:
- Secure individual MCP servers — bring each server under Access (Part A–B).
- Create an MCP portal — aggregate servers into one governed endpoint (Part C–E).
Part A — Choose how to secure each MCP server
Cloudflare Access can front an MCP server in a few ways. Pick per server:
| Approach |
Best for |
Who handles auth |
| Self-hosted MCP server (recommended) |
MCP servers you run, served through Cloudflare in this account |
Cloudflare Access (simplest — Access does it for you) |
| Customer-managed third-party MCP |
Third-party MCP code running on a hostname you control |
The third-party MCP server |
| SaaS-managed third-party MCP |
Provider-hosted MCP that accepts your OAuth/OIDC settings |
The MCP server, with Access as the OIDC provider |
⭐ Recommended: for servers you control, use the self-hosted approach and let Access handle authentication. Only use the SaaS/OIDC approach when a provider-hosted server requires it.
Making Access the OAuth provider (SaaS-managed) — the short version
- 👉 Access controls → Applications → Create new application → SaaS application.
- ⌨️ Name it (e.g.
MCP server), choose OIDC, Add application.
- ⌨️ In Redirect URLs, enter the MCP server's callback URL (e.g.
https://<mcp-host>/callback).
- 📋 Copy the Client ID, Client secret, Token / Authorization / Key endpoints into your MCP server's config.
- 👉 Add Access policies (who can use it) and select your identity providers. Save.
⚠️ Only enable Managed OAuth for MCP server code that validates the Access JWT (Cf-Access-Jwt-Assertion header). For third-party code you can't change, use the server's own OAuth flow.
Part B — Add an MCP server to Access
Bring each server under centralized management (this is also the prerequisite for putting it in a portal).
- 👉 In the dashboard, go to Zero Trust → Access controls → AI controls.
- 👉 Open the MCP servers tab → Add an MCP server.
- ⌨️ Enter a name (e.g.
Company Wiki MCP).
- ⌨️ (Optional) set a custom Server ID.
- ⌨️ In HTTP URL, enter the server's full URL — e.g. the Cloudflare Docs MCP server:
https://docs.mcp.cloudflare.com/mcp.
- 👉 Add Access policies to show/hide the server: users who match an Allow policy will see it in a portal; others won't.
- 👉 Click Save and connect server.
- 👉 If the server supports OAuth, log in when redirected — that account becomes the admin credential for this server (a portal can use it to make requests).
📺 What you'll see: Access validates the connection, pulls the list of tools/prompts/resources, and the server status becomes Ready.
⚠️ Watch out: Adding Access policies here controls visibility in portals. A blocked user could still hit the server via its direct URL — to truly enforce auth, make Access the server's OAuth provider (Part A).
✅ Checkpoint: Your MCP server shows Ready in the MCP servers tab.
Part C — Create an MCP server portal
A portal gives your users and agents one endpoint that aggregates multiple MCP servers, with only the tools you choose.
- 👉 Zero Trust → Access controls → AI controls → Add MCP server portal.
- ⌨️ Enter a name (e.g.
Engineering AI Tools).
- 👉 Under Custom domain, pick a domain (must be an active zone in your account); optionally set a subdomain (e.g.
mcp).
- 👉 Add MCP servers — select the servers from Part B you want in this portal.
- 👉 (Optional) Under MCP servers, configure the tools and prompts exposed through the portal — expose only what this audience needs.
- 👉 Set Require user auth per server:
- Enabled (default) — each user authenticates with their own credentials to that server (least privilege, best audit trail).
- Disabled — connected users reach the server via its admin credential (use sparingly).
- 👉 Add Access policies defining who can connect to the portal.
- 👉 Click Add an MCP server portal.
📺 Users now connect at https://<subdomain>.<domain>/mcp with any MCP client.
⚠️ Policy limitation: Independent MFA, purpose justification, and temporary authentication are not enforced for servers authorized through a portal. If a server needs step-up MFA, enforce it at the server's own Access application.
✅ Checkpoint: The portal appears in AI controls with your chosen servers, and the portal URL resolves.
The less irrelevant context you expose, the better (and safer) the AI's responses.
- 👉 Choose specific tools/prompts per portal (Part C step 5) so users get a focused toolset.
- 👉 Rename with aliases: edit a tool's or prompt's name and description at the portal or server level — without changing the upstream server. Clear names help both people and AI agents pick the right tool.
- 👉 Optimize context: portals support query-parameter options to minimize or hide tool definitions and reduce context-window usage.
- 💡 Code Mode (on by default): collapses all tools into a single
code tool — the agent writes JavaScript that calls typed methods, run in an isolated Cloudflare Worker. Context usage stays fixed no matter how many tools you add.
Part E — Connect clients & agents (Managed OAuth + service tokens)
Human users / interactive AI clients — Managed OAuth
Managed OAuth is on by default for new portals. It lets non-browser MCP clients (Claude Desktop, Cursor, CLIs, SDKs) authenticate via a standard OAuth 2.0 authorization-code flow: the client gets a 401 with a WWW-Authenticate header, opens the browser to your Access login, and receives a token. Same Access policies, new transport.
- 👉 To confirm/enable: portal → ⋯ → Edit → Advanced settings → Managed OAuth → on → Save.
Bots / autonomous agents — service tokens
For machine-to-machine agents that can't do a browser login:
- 👉 Create an Access service token (Access → Service Auth → Service Tokens).
- 👉 Add a Service Auth policy matching that token to the portal's Access application and to each linked server's application.
- 👉 Turn Require user auth off for those servers (the portal uses the admin credential).
- 👉 The agent connects with
CF-Access-Client-Id and CF-Access-Client-Secret headers and sees the tools of every server it's authorized for.
⚠️ Servers that still require per-user OAuth are excluded from service-token sessions (a token can't complete a per-user grant).
✅ Checkpoint: An MCP client connects to https://<subdomain>.<domain>/mcp, authenticates through Access, and sees only the curated tools.
Part F — Observability & DLP
- 👉 Access logs record each individual tool request made through the portal — go to Logs → Access to see who/what invoked which tool.
- 👉 (Optional, powerful) Route portal traffic through Gateway to get richer HTTP logging and DLP scanning — so sensitive data flowing into or out of MCP tools is inspected with the same DLP profiles from Module 6.
✅ Checkpoint: Tool calls appear in Access logs; if routed through Gateway, they also show in Gateway HTTP logs with any DLP matches.
✅ Module 7b complete!
You now have:
- ✅ MCP servers brought under Access (with Access optionally the OAuth provider)
- ✅ A single MCP portal endpoint aggregating curated tools
- ✅ Per-user identity (Require user auth) and service-token access for bots
- ✅ Managed OAuth for non-browser AI clients
- ✅ Request-level logging, optionally with Gateway + DLP
How this fits the bigger AI picture
| Layer |
Module |
Governs |
| Users browsing AI web apps |
7 |
Shadow-AI discovery, allow-with-guardrails, prompt DLP |
| AI agents connecting to tools |
7b (this) |
MCP servers + portals behind Access |
| Risky AI use in the browser |
5c |
Isolate + disable paste/upload |
| Sensitive data detection |
6 |
DLP profiles (incl. AI prompt topics) |
Quick troubleshooting
| Problem |
Fix |
| No AI controls in the menu |
Confirm your plan/entitlement and that you're a Zero Trust admin |
| MCP server stuck, not Ready |
Re-check the HTTP URL; complete the OAuth login if the server requires it (Part B) |
| Blocked user still reaches a server |
Add-to-Access policies only control portal visibility — make Access the server's OAuth provider to enforce auth (Part A) |
| Portal URL won't create |
The custom domain must be an active zone in your account (Part C) |
| AI client won't authenticate |
Ensure Managed OAuth is on for the portal (Part E) |
| Bot/agent can't connect |
Use a service token + Service Auth policies on portal and servers, and turn Require user auth off (Part E) |
| Step-up MFA not prompting |
MFA/purpose-justification isn't enforced through a portal — enforce it on the server's own Access app (Part C) |
Connect whole offices and data centers to Cloudflare.
Nguồn cộng đồng — không phải tài liệu chính thức của Cloudflare: https://zerotrust.cfsase.workers.dev
Community source — not an official Cloudflare publication: https://zerotrust.cfsase.workers.dev