Mô-đun 4 — ZTNA: Xuất bản ứng dụng nội bộ với Access
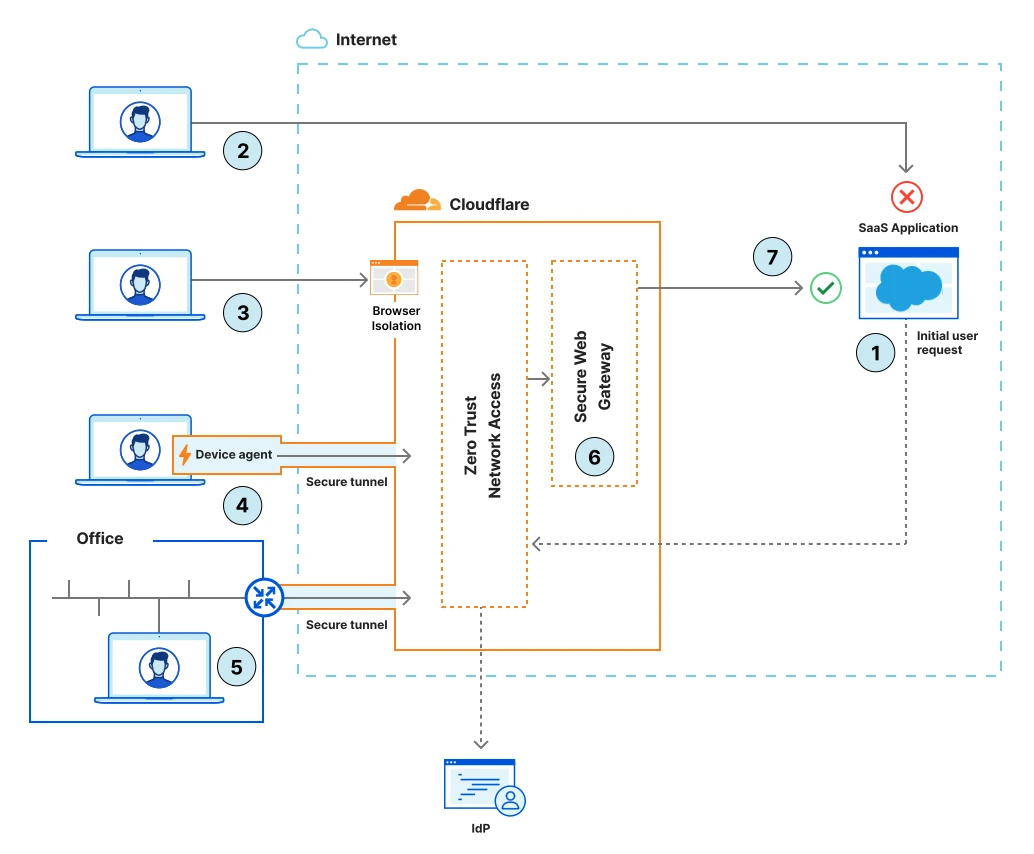
Mục tiêu: Làm cho một ứng dụng nội bộ tới được an toàn từ mọi nơi — không cần VPN và không mở bất kỳ cổng firewall vào nào — và kiểm soát chính xác ai có thể tới nó.
|
|
| 👤 Ai làm việc này |
Chủ ứng dụng + Security |
| ⏱️ Thời gian |
~60 phút |
| 🎯 Kết thúc bạn sẽ có |
Một ứng dụng nội bộ được xuất bản tại URL thật, chỉ những người bạn cho phép mới tới được |
| ✋ Trước khi bắt đầu |
Mô-đun 1–3 xong; một ứng dụng web nội bộ để thử (ví dụ wiki nội bộ, Grafana, công cụ dev) chạy ở nơi bạn kiểm soát; một máy chủ/VM tới được ứng dụng đó |
🧭 Cách hoạt động: Bạn chạy một chương trình nhỏ tên cloudflared cạnh ứng dụng. Nó tạo kết nối an toàn, chỉ chiều ra (một "Tunnel") tới Cloudflare — nên bạn không bao giờ phơi ứng dụng ra Internet. Rồi Access đặt kiểm tra đăng nhập phía trước.
Chúng ta sẽ làm: (A) tạo Tunnel → (B) kết nối ứng dụng → (C) thêm ứng dụng Access → (D) viết chính sách → (E) kiểm tra → (F) xây nhóm dùng lại được.
Phần A — Tạo Tunnel
- 👉 Zero Trust → Networks → Tunnels.
- 👉 Nhấp Create a tunnel.
- 👉 Chọn Cloudflared → Next.
- ⌨️ Đặt tên theo vị trí, ví dụ
datacenter-1 → Save tunnel.
📺 Bạn sẽ thấy: Trang "Install and run a connector" với lệnh cho từng hệ điều hành và một install token dài đã điền sẵn.
- 👉 Chọn tab cho hệ điều hành máy chủ của bạn (Windows / macOS / Debian / Red Hat / Docker).
- 👉 Sao chép lệnh hiện ra — nó đã chứa token duy nhất của bạn.
⚠️ Lưu ý: Lệnh đó chứa token bí mật. Hãy coi như mật khẩu; đừng dán vào chat hoặc ticket.
Phần B — Kết nối ứng dụng của bạn
Bước B1 — Chạy connector trên máy chủ
- 👉 Đăng nhập vào máy chủ/VM tới được ứng dụng của bạn.
- 👉 Dán và chạy lệnh bạn đã sao chép. Ví dụ, trên Debian/Ubuntu trông như:
curl -L https://pkg.cloudflare.com/install.sh | sudo bash
sudo cloudflared service install eyJhIjoiZXhhbXBsZS...
- 📺 Quay lại bảng điều khiển, Connector status của tunnel đổi thành Connected / Healthy (cho khoảng ~30 giây).
✅ Điểm kiểm tra: Bảng điều khiển hiện connector của bạn là Healthy. Nhấp Next.
Bước B2 — Báo Cloudflare ứng dụng sống ở đâu (public hostname)
Giờ bạn sẽ ánh xạ một URL công khai tới ứng dụng nội bộ.
- 📺 Bạn đang ở bước Route tunnel / Public Hostnames.
- 👉 Nhấp Add a public hostname và điền:
| Trường |
Ví dụ |
Ý nghĩa |
| Subdomain |
wiki |
Tên người dùng sẽ gõ |
| Domain |
yourcompany.com |
Một domain trong tài khoản Cloudflare của bạn |
| Type |
HTTP |
Cách cloudflared tới ứng dụng cục bộ |
| URL |
localhost:3000 |
Nơi ứng dụng chạy trên máy chủ đó |
- 👉 Nhấp Save tunnel.
📺 Bạn sẽ thấy: wiki.yourcompany.com nay đã được xuất bản và proxy tới ứng dụng nội bộ.
💡 Chưa có domain trong Cloudflare? Bạn cần thêm một domain (zone) để dùng ứng dụng Access self-hosted với hostname của riêng bạn. Nhờ quản trị viên thêm domain, hoặc dùng domain bạn đã quản lý trong Cloudflare.
✅ Điểm kiểm tra: Truy cập https://wiki.yourcompany.com — bạn tới được ứng dụng (lúc này nó mở cho bất kỳ ai; phần tiếp theo sẽ khóa lại).
Phần C — Thêm ứng dụng Access
Phần này đặt kiểm tra đăng nhập phía trước wiki.yourcompany.com.
- 👉 Zero Trust → Access controls → Applications.
- 👉 Nhấp Create new application (Add an application).
- 👉 Chọn Self-hosted and private.
📺 Bạn sẽ thấy: Trang cấu hình ứng dụng.
- ⌨️ Application name:
Internal Wiki.
- 👉 Nhấp Add public hostname và nhập cùng hostname bạn đã xuất bản: subdomain
wiki, domain yourcompany.com.
- 👉 Đặt Session Duration thành
24h (dùng giá trị ngắn hơn như 1h cho ứng dụng nhạy cảm).
- 👉 Dưới authentication, chọn identity provider từ Mô-đun 2.
- 💡 Nếu bạn chỉ có một IdP, bật Apply instant authentication để người dùng bỏ qua màn hình chọn.
- 💡 Bật Authenticate with Cloudflare One Client để người dùng WARP đã đăng nhập vào được liền mạch.
- Đừng nhấp Create ngay — trước hết thêm chính sách ở Phần D (trình hướng dẫn cho phép thêm ngay trong luồng), hoặc nhấp Create rồi thêm chính sách ngay sau. Cả hai đều được.
Phần D — Viết chính sách truy cập (ai được phép)
-
👉 Trong ứng dụng, vào phần Policies → Add a policy (hoặc Create new policy).
-
⌨️ Policy name: Allow — Employees on healthy devices.
-
👉 Action: Allow.
-
👉 Xây các quy tắc:
| Loại quy tắc |
Selector |
Operator |
Value |
| Include |
Emails ending in |
— |
@yourcompany.com |
| Require |
Device Posture |
in |
Disk encrypted (từ Mô-đun 3) |
(Nếu nhóm IdP của bạn đã kiểm tra đúng ở Mô-đun 2, dùng Include → IdP Groups → Engineering thay cho domain email để kiểm soát chặt hơn.)
-
👉 Nhấp Save chính sách, rồi Save/Create ứng dụng.
💡 Thực hành tốt — thêm lưới default-deny: tạo chính sách thứ hai, ưu tiên thấp hơn, tên Block — Everyone với Action = Block và Include = Everyone. Vì chính sách được đọc từ trên xuống, Allow khớp người của bạn trước và mọi người khác gặp Block.
⚠️ Lưu ý: Không bao giờ dùng action Bypass trên ứng dụng nhạy cảm — nó gỡ hoàn toàn kiểm tra đăng nhập.
Phần E — Kiểm tra (phần đáng thỏa mãn)
Kiểm tra 1 — người dùng được phép
- 👉 Trên thiết bị pilot (đã đăng nhập với tư cách nhân viên được phép), mở
https://wiki.yourcompany.com.
- 📺 Bạn được đưa tới đăng nhập công ty (hoặc vào thẳng, nếu instant auth + phiên WARP). Sau đăng nhập, ứng dụng của bạn tải. ✅
Kiểm tra 2 — người dùng bị chặn
- 👉 Mở cùng URL trong cửa sổ riêng tư/ẩn danh và đăng nhập với người không được phép (hoặc dùng email cá nhân).
- 📺 Bạn thấy trang chặn Cloudflare "You don't have access". ✅
Kiểm tra 3 — xem nhật ký
- 👉 Zero Trust → Logs → Access (hoặc Access → Logs).
- 📺 Bạn thấy cả hai lần thử: một Allowed, một Blocked, mỗi cái kèm email người dùng và chính sách đã quyết định.
✅ Điểm kiểm tra: Đúng người vào được, sai người bị chặn, và bạn thấy điều đó trong nhật ký. Bạn vừa thay thế VPN cho ứng dụng này. 🎉
Phần F — Xây nhóm dùng lại được (để không phải gõ lại)
Hiện các quy tắc của bạn được gõ vào một ứng dụng. Khi bạn thêm ứng dụng thứ 2, 3, 10, bạn không muốn gõ lại. Xây một Access Group dùng lại được một lần.
- 👉 Zero Trust → Access controls → Policies → Groups (hoặc Reusable components → Groups).
- 👉 Nhấp Add a group.
- ⌨️ Name:
Secure employees.
- 👉 Thêm quy tắc một lần, ví dụ:
- Include → Emails ending in →
@yourcompany.com
- Require → Device Posture →
Disk encrypted
- 👉 Nhấp Save.
Giờ trong chính sách của bất kỳ ứng dụng nào, bạn chỉ cần chọn Include → Access Groups → Secure employees. Đổi nhóm một lần, mọi ứng dụng cập nhật.
💡 Mẹo: Cũng tạo Lists dùng lại được (Zero Trust → Reusable components → Lists) cho những thứ như danh sách email Offboarding hoặc số serial thiết bị được duyệt — rồi Exclude → Emails in list → Offboarding trên mọi ứng dụng.
✅ Mô-đun 4 hoàn tất!
Bạn hiện có:
- ✅ Ứng dụng nội bộ được xuất bản qua Tunnel (không mở cổng vào)
- ✅ Chính sách Access cho phép đúng người, chặn người khác
- ✅ Kiểm tra allow/block hoạt động, thấy được trong nhật ký
- ✅ Nhóm dùng lại được để áp dụng cho ứng dụng sau
Muốn thêm loại ứng dụng?
- Ứng dụng SaaS (Salesforce, v.v.): Applications → Create new application → SaaS → tích hợp qua SAML/OIDC.
- Máy chủ SSH / RDP: xuất bản qua cùng Tunnel và dùng Access for Infrastructure (tùy chọn render trên trình duyệt, không cần client).
- Phương án dự phòng thiết bị không quản lý: giữ Allow cho thiết bị khỏe mạnh, và thêm quy tắc Gateway → Isolate (Mô-đun 5) để thiết bị rủi ro mở ứng dụng trong trình duyệt từ xa an toàn thay vì bị chặn.
Khắc phục sự cố nhanh
| Vấn đề |
Cách xử lý |
| URL ứng dụng hiện lỗi Cloudflare, không phải ứng dụng của bạn |
Connector tunnel không healthy, hoặc URL/port cục bộ sai — kiểm tra lại Phần B |
| Mọi người bị chặn, kể cả bạn |
Quy tắc Include quá hẹp hoặc chính sách Block nằm trên Allow — sửa thứ tự (Phần D) |
| Quy tắc nhóm không bao giờ khớp |
Nhóm không đi qua được ở bài Test của Mô-đun 2 — sửa IdP trước |
| Được phép nhưng ứng dụng cứ hỏi đăng nhập |
Session duration quá ngắn, hoặc cookie bị chặn — tăng session duration |
| "DNS record already exists" |
Đã có bản ghi cho hostname đó; xóa nó hoặc chọn subdomain khác |
🔌 Muốn bức tranh đầy đủ về connectors? Mô-đun này dùng một Cloudflare Tunnel cho một ứng dụng. Để kết nối cả subnet, làm site-to-site / device mesh, hoặc đưa cả văn phòng lên mạng, xem Mô-đun 4b — Connectors: Tunnel, Mesh & Appliance.
Mô-đun 4b đi sâu về Tunnel, Mesh và Cloudflare One Appliance. Hoặc chuyển sang Gateway để bắt đầu lọc lưu lượng.
Module 4 — ZTNA: Publish a Private App with Access
Goal: Make an internal application reachable securely from anywhere — without a VPN and without opening any inbound firewall ports — and control exactly who can reach it.
|
|
| 👤 Who does this |
App owner + Security |
| ⏱️ Time |
~60 minutes |
| 🎯 You'll finish with |
A private app published at a real URL, reachable only by the people you allow |
| ✋ Before you begin |
Modules 1–3 done; a private web app to test (e.g. an internal wiki, Grafana, a dev tool) running somewhere you control; a server/VM that can reach that app |
🧭 How this works: You'll run a tiny program called cloudflared next to your app. It makes a safe, outbound-only connection (a "Tunnel") to Cloudflare — so you never expose your app to the internet. Then Access puts a login check in front of it.
We'll go: (A) create a Tunnel → (B) connect your app → (C) add an Access application → (D) write the policy → (E) test → (F) build reusable groups.
Part A — Create a Tunnel
- 👉 Zero Trust → Networks → Tunnels.
- 👉 Click Create a tunnel.
- 👉 Choose Cloudflared → Next.
- ⌨️ Name it after the location, e.g.
datacenter-1 → Save tunnel.
📺 What you'll see: An "Install and run a connector" page with commands for each operating system and a long install token already filled in.
- 👉 Choose the tab for your server's OS (Windows / macOS / Debian / Red Hat / Docker).
- 👉 Copy the command shown — it already contains your unique token.
⚠️ Watch out: That command contains a secret token. Treat it like a password; don't paste it into chat or tickets.
Part B — Connect your app
Step B1 — Run the connector on your server
- 👉 Log in to the server/VM that can reach your app.
- 👉 Paste and run the command you copied. For example, on Debian/Ubuntu it looks like:
curl -L https://pkg.cloudflare.com/install.sh | sudo bash
sudo cloudflared service install eyJhIjoiZXhhbXBsZS...
- 📺 Back in the dashboard, the tunnel's Connector status changes to Connected / Healthy (give it ~30 seconds).
✅ Checkpoint: The dashboard shows your connector as Healthy. Click Next.
Step B2 — Tell Cloudflare where your app lives (public hostname)
You'll now map a public URL to your internal app.
- 📺 You're on the Route tunnel / Public Hostnames step.
- 👉 Click Add a public hostname and fill in:
| Field |
Example |
Meaning |
| Subdomain |
wiki |
The name users will type |
| Domain |
yourcompany.com |
A domain in your Cloudflare account |
| Type |
HTTP |
How cloudflared reaches your app locally |
| URL |
localhost:3000 |
Where your app runs on that server |
- 👉 Click Save tunnel.
📺 What you'll see: wiki.yourcompany.com is now published and proxied to your internal app.
💡 No domain in Cloudflare yet? You'll need to add one (a zone) to use self-hosted Access apps with your own hostname. Ask your admin to add the domain, or use a domain you already manage in Cloudflare.
✅ Checkpoint: Visit https://wiki.yourcompany.com — you reach your app (right now it's open to anyone; the next part locks it down).
Part C — Add an Access application
This puts the login check in front of wiki.yourcompany.com.
- 👉 Zero Trust → Access controls → Applications.
- 👉 Click Create new application (Add an application).
- 👉 Choose Self-hosted and private.
📺 What you'll see: An application configuration page.
- ⌨️ Application name:
Internal Wiki.
- 👉 Click Add public hostname and enter the same hostname you published: subdomain
wiki, domain yourcompany.com.
- 👉 Set Session Duration to
24h (use a shorter value like 1h for sensitive apps).
- 👉 Under authentication, select the identity provider from Module 2.
- 💡 If you only have one IdP, turn on Apply instant authentication so users skip the chooser screen.
- 💡 Turn on Authenticate with Cloudflare One Client to let already-signed-in WARP users in seamlessly.
- Don't click Create yet — first add a policy in Part D (the wizard lets you add it inline), or click Create and add the policy right after. Either works.
Part D — Write the access policy (who's allowed)
-
👉 In the application, go to the Policies section → Add a policy (or Create new policy).
-
⌨️ Policy name: Allow — Employees on healthy devices.
-
👉 Action: Allow.
-
👉 Build the rules:
| Rule type |
Selector |
Operator |
Value |
| Include |
Emails ending in |
— |
@yourcompany.com |
| Require |
Device Posture |
in |
Disk encrypted (from Module 3) |
(If your IdP groups tested correctly in Module 2, use Include → IdP Groups → Engineering instead of the email domain for tighter control.)
-
👉 Click Save the policy, then Save/Create the application.
💡 Best practice — add a default-deny net: create a second, lower-priority policy named Block — Everyone with Action = Block and Include = Everyone. Because policies are read top-down, the Allow matches your people first and everyone else hits the Block.
⚠️ Watch out: Never use the Bypass action on a sensitive app — it removes the login check entirely.
Part E — Test it (the satisfying part)
Test 1 — an allowed user
- 👉 On your pilot device (signed in as an allowed employee), open
https://wiki.yourcompany.com.
- 📺 You're sent to your company login (or straight in, if instant auth + WARP session). After login, your app loads. ✅
Test 2 — a blocked user
- 👉 Open the same URL in a private/incognito window and sign in as someone not allowed (or use a personal email).
- 📺 You see the Cloudflare "You don't have access" block page. ✅
Test 3 — check the logs
- 👉 Zero Trust → Logs → Access (or Access → Logs).
- 📺 You see both attempts: one Allowed, one Blocked, each with the user's email and the policy that decided it.
✅ Checkpoint: The right people get in, the wrong people are blocked, and you can see it in the logs. You've just replaced VPN for this app. 🎉
Part F — Build reusable groups (so you don't repeat yourself)
Right now your rules are typed into one app. When you add a 2nd, 3rd, 10th app, you don't want to re-type them. Build a reusable Access Group once.
- 👉 Zero Trust → Access controls → Policies → Groups (or Reusable components → Groups).
- 👉 Click Add a group.
- ⌨️ Name:
Secure employees.
- 👉 Add rules once, e.g.:
- Include → Emails ending in →
@yourcompany.com
- Require → Device Posture →
Disk encrypted
- 👉 Click Save.
Now in any application's policy, you can simply select Include → Access Groups → Secure employees. Change the group once, and every app updates.
💡 Tip: Also create reusable Lists (Zero Trust → Reusable components → Lists) for things like an Offboarding email list or approved device serial numbers — then Exclude → Emails in list → Offboarding across all apps.
✅ Module 4 complete!
You now have:
- ✅ A private app published via Tunnel (no inbound ports opened)
- ✅ An Access policy allowing the right people, blocking others
- ✅ A working allow/block test, visible in logs
- ✅ A reusable group to apply to future apps
Want more app types?
- SaaS apps (Salesforce, etc.): Applications → Create new application → SaaS → integrate via SAML/OIDC.
- SSH / RDP servers: publish through the same Tunnel and use Access for Infrastructure (optionally browser-rendered, no client needed).
- Unmanaged-device fallback: keep the Allow for healthy devices, and add a Gateway → Isolate rule (Module 5) so risky devices open the app in a safe remote browser instead of being blocked.
Quick troubleshooting
| Problem |
Fix |
| App URL shows a Cloudflare error, not your app |
Tunnel connector not healthy, or the local URL/port is wrong — recheck Part B |
| Everyone is blocked, including you |
Your Include rule is too narrow or a Block policy is above the Allow — fix order (Part D) |
| Group rule never matches |
Groups didn't come through in Module 2's Test — fix the IdP first |
| Allowed but app keeps asking to log in |
Session duration too short, or cookies blocked — raise session duration |
| "DNS record already exists" |
A record for that hostname exists; delete it or pick another subdomain |
🔌 Want the full picture on connectors? This module used one Cloudflare Tunnel for a single app. To connect whole subnets, do site-to-site / device mesh, or bring an entire office online, see Module 4b — Connectors: Tunnel, Mesh & Appliance.
Module 4b goes deep on Tunnel, Mesh, and the Cloudflare One Appliance. Or skip to Gateway to start filtering traffic.
Nguồn cộng đồng — không phải tài liệu chính thức của Cloudflare: https://zerotrust.cfsase.workers.dev
Community source — not an official Cloudflare publication: https://zerotrust.cfsase.workers.dev